

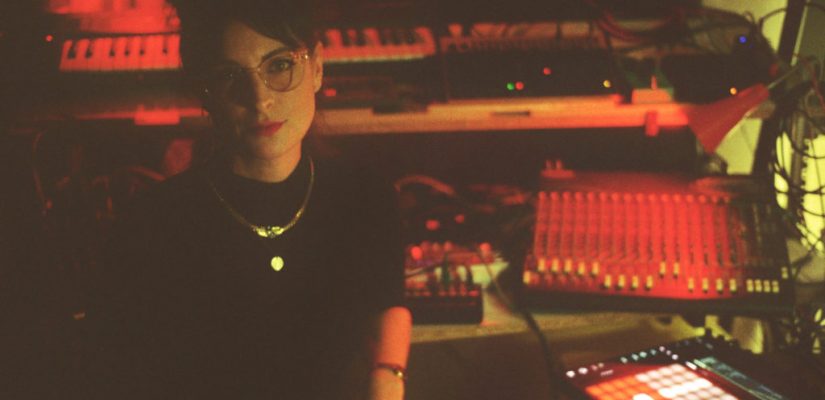
Dubby, spacious, acidic, and rave-inspired are just some of the ways Australian-born artist Eluize describes the house and techno she has been creating and curating in her adopted home city of Berlin. As a DJ and live act, Eluize, born Emma Sainsbury, has performed at some of Europe’s most renowned clubs, and she’s also made regular appearances across the globe, including Australia’s Rainbow Serpent Festival, Savage Hanoi, and Hypnotic Hong Kong.
Alongside her production and performance pursuits, Eluize is dedicated to sharing her expertise and uplifting up-and-coming members of the music industry. This year she has launched a coaching initiative to support women, trans, and non-binary artists in producing and performing electronic music, releasing, label management, and more.
As part of this month’s EDMjunkies+ edition, Eluize is releasing her new track, “EMDR.” We caught up with her to take a deep dive into the inspiration, techniques, and creative processes used to produce the track—and she has shared a download of her Ableton Live Set for a direct look into her methods.
Download the Live Set to Eluize “EMDR” here*
*Requires a Live 10 Suite license or the free trial.
Please note: this Live Set and included samples are for educational use only and cannot be used for commercial purposes.
You can download Eluize’s “EMDR” via EDMjunkies+ once you subscribe here. EDMjunkies+ is a curated subscription service and music community delivering exclusive music and content every month, plus access to the EDMjunkies+ member’s area, where you can submit your music to be showcased across EDMjunkies’s channels and to the EDMjunkies+ community.
Eluize, thank you for sharing your Live Set with us. Please can you tell us a bit about the inspiration behind the track?
Thanks for having me. The track was inspired by a poem I wrote about a therapy I had for post-traumatic stress disorder (PTSD) called EMDR, meaning eye movement desensitization and reprocessing. This experience was so intense and perspective-changing, and I wanted to make something that finished releasing the emotion wrapped up in the process. EMDR is rhythmic; it takes you down through the dark stuff, but then suddenly one day my fear and anxiety lifted and my outlook brightened again. It was incredible. With this in mind, I wanted the track to be hypnotic and gritty, but with light in it, too.
You have a group containing your melodic parts on track one. On the first melody, you have used Live’s Wavetable synthesizer with some automation across various parameters. How did you find working with Wavetable to achieve this sound?
It was my first time using Wavetable, and what an awesome synth. I have my favorite hardware that I usually turn to, but Covid-19 has meant I’ve been in Australia for an extended period, so I wanted to try to make this whole track “in the box,” get out of my usual rhythm, and explore Live 10 Suite more deeply. Wavetable is so adjustable, and I barely scratched the surface. For this sound, I started with a preset and automated the filter frequency, resonance, and oscillator volume parameters to make it creep in and out of the mix. Having the second oscillator pitched up seven semitones makes the “chord” sound and adds impact to a fairly simple melodic pattern.
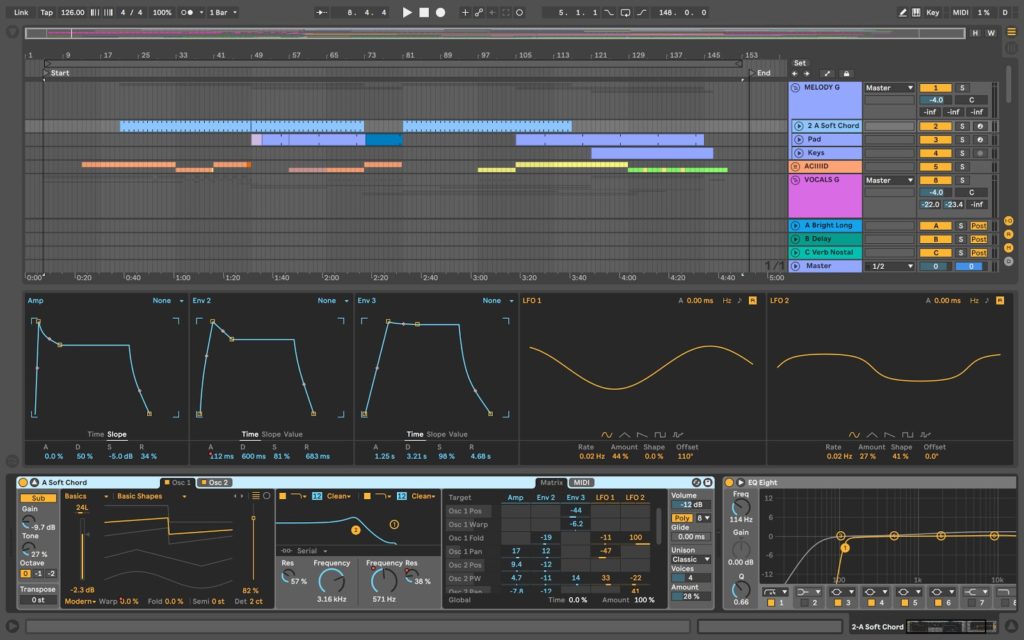
Can you tell us about the ethereal pad sound on track three?
This is so lush. It’s another beautiful sound from the Wavetable synthesizer. I automated the amp attack in places to give it more of a swelling feeling.
On track four in your melody group, there is a distorted arpeggio coming in towards the latter part of the arrangement. What was your process in making this sound?
When I started with the melodic ideas for this track, I wrote one complex MIDI line over a couple of octaves and then split it up onto different instruments, including the soft chord line on track two, the tom standing in for a bass line, and also for the pattern on this track in question. This approach helps me make sure all the parts are speaking the same rhythmic and melodic language. In this pattern, I used the Arturia Mini V and ran its signal through Soundtoys’ Decapitator for warmth and grit. Finally, I applied the Soundtoys Crystallizer plug-in which adds the cascading pitched echoes.
On track five there are some Roland TB-303-inspired acid basslines driven by Operator—a synthesizer designed for combining classic analog sounds and frequency modulation. You have also set up two macros for achieving clean or dirtier timbres. Can you tell us about your processes here?
I love the acid sound. I have a Cyclone Bass Bot TT 303 in my studio and I use it as either an instrument or a sequencer in almost every track—so I thought I’d see what I could create inside Operator. I had a couple of tries in re-creating this sound. They both turned out a little different, which is fun. When I’m using the Cyclone Bass Bot, I record sweeps with live twists of the cutoff, resonance, decay, etc. I set up macros as an ergonomic way to adjust and automate similar features in Live.
As a music maker and a vocalist, it’s interesting to hear how much work you have done with your own voice in this arrangement. Where did your ideas come from when writing the lyrics for this piece?
I always go in pretty deep with vocals. I write a lot of words and rhymes about the topic or the energy of a track I am working on. Then I usually record way too much and simply edit, edit, and edit. As I mentioned above, the vocal ideas for this project come from a poem. I recorded the spoken word some time ago but I hadn’t started any musical ideas back then. To get those recordings to where they are now, I snipped out small, rhythmical parts from the full take, I then used those snippets to make samples and loops. Next, I sang hook lines with a selection of lyrics. These hook lines create melodies and harmonies as the energy builds. Here’s the original poem:
“Watch as my fingers go left and go right
Lean into the pain of what happened that night
Relive every moment through tears as they well
I’ll follow you down to the fire of your hell.”
“We’ll keep going back ‘til you can’t breathe or speak
Then once more to be sure ‘til this time next week
After months of reviving the mind-numbing fear
There’ll come a moment exquisitely clear.”
“When terror descends a new vision in place
And the violence and panic you usually face
Fade finally out to the cosmos to rest
And you wake up one day feeling calm.”
Your vocal group sits on track eight and hosts a number of additional vocal tracks. Across the overall group, you have applied some mid-side EQ and two instances of Live’s Glue Compressor in series. How does this configuration of processing across the group channel help with your vocals?
The mid-side EQ is to clean up some bottom end in the stereo signal of this group, which gives a bit more clarity. The first instance of Glue Compressor acts quickly to catch high peaks, while the second gently smoothes out the overall volume. Because I have a lot of different vocal channels with different processing, it’s important to wrangle them all together in the group so they make a coherent-sounding instrument.
You have used a lot of Live’s native devices for your vocal effect processing. There is often a combination of delays, choruses, and reverbs which are either applied as insert effects or via sends. When choosing and combining these devices, what was the overall effect you were aiming for?
I was having a little adventure here. Usually, in the studio or in live situations, I use pedals for my vocals, but I wanted to try lots of native Ableton effects here. I was going for an ethereal or edgy effect. For the more ethereal vibes, I was aiming to create something building and swelling, with beautiful energy and tension behind it. For the edgier effects, I looked for an abrasive phone or intercom-type EQ and distortion. I use chorus to add body or creepy extra pitches. The delays and echoes give a trippy, hypnotic feeling and make the vocals swell like pads.
On track 14 in the vocal group, there is a nice swell sound. How did you create that?
I love this trick. I use this as a way to wind sounds down into a breakdown and lead into a vocal. I put a copy of the Bright Long Verb from the A send on the vocal channel and mixed it one hundred percent wet. I muted the whole phrase except the first open/vowel sound. I then played the audio through the reverb and recorded it into a new track, letting the reverb tail fade out naturally. Then I reversed the sample so it would swell. I left an original copy the right way around (you’ll see that in the session too), at a lower volume that fades away after the swell peaks, so it doesn’t just drop into nothing suddenly. It is similar to a reversing crash or a white noise build except it has the same timbre as the vocal sound I was introducing.
The vocal timbre takes on a new characteristic and texture on track 15. How did you process the audio to achieve that effect?
I did some auto-tuning with the Max for Live Autotuna device. I mixed the wet/dry signal at 63 percent because I was a bit out of key with my vocal take. I’d love to be a more accurate singer (something I’m working on), but I actually thought it added an interesting phase effect and a nice tension between the slightly out notes and Autotuna’s effect of pulling them back in. Also on this channel is a de-esser and Soundtoys’ Echoboy, which I used to create that intercom EQ effect.
On Track 16 you’ve doubled up the vocal line with track 15 in places and used two instances of Live’s Auto Pan device in series. What was the thinking behind this technique?
I double track vocals sometimes instead of only relying on chorus effects. That way I can treat each differently and pan them left and right for more breadth. The slight differences in the takes also add character. The first Auto Pan device on this channel is used to create a tremolo effect, adding rhythmical quality to a sustained note, and the second one is used to create stereo panning. I wanted to combine this with the take on track 15 to give this part a swirling and rich texture.

There is an interesting phasing filter effect coming through on track 17. Can you walk us through your process here and what you were aiming to achieve?
This is a returning vocal from earlier. It is reintroduced as a layer to build intensity and give the feeling of being surrounded and disoriented by looping, repeating, and distorting thoughts and memories. I used the Filter Phaser Audio Effect Rack in Live 10. Its heavy stereo panning is all-encompassing and the resonant filter sweeps add to the unsettling swirl, so even at a low volume the part cuts through the mix.
Your kick drum sits on track 21. It sounds like you’ve used some heavy distortion. What effects did you apply, and do they relate to the story you are telling in this song?
I instinctively gave the kick a dark, menacing role in the composition. It conveys the relentlessness of therapy and the revisiting of a trauma time and time again. This was the hardest part about the process: knowing you have to hammer tirelessly through the pain, panic, and sadness with only the vague hope you might finally find some relief. I ran a “standard” ‘90s kick sample from the Ableton library through an overdriven distortion in Soundtoys Decapitator to make it sound rough and violent.
On track 22 you have a tom sound which plays nicely off of the kick and seems to provide a fundamental role in the low-frequency registers of the song. Where did you find the sample from?
The sample is an 808 tom sound from the core library popped into a Simpler device. I took some notes from my original MIDI pattern and made the loop length 1.5 bars so it would interact with the other parts in an alternating way. I felt this type of percussive bottom end was perfect to support the energy of the track, and I made sure it never hits at the same time as the kick so they dance well together.
There is a drum group with a combination of Live’s Glue Compressor and Compressor devices on track 23. What effect do you aim for when combining two different compressors in this way?
The Glue Compressor is to bring everything together, to make sure nothing’s jumping out too much or suddenly; the second compressor is side-chained to the kick to make them breathe together and lock them into a mutual groove.
Did you also record the breath sample on track 24 yourself?
Yes, this was one from within the original spoken word vocal recording. I like using breath sounds as percussive elements in tracks and often repitch or twist them in some way so they are different from the ones in the performed phrases. Here I put a single breath inside a Simpler device, adjusted the fade in and out, and then distorted it with Soundtoys Decapitator.
Track 25 has a nice tambourine loop with a melodic quality. Where does the loop come from and how did you process it?
The loop comes from a mystery sample pack I’ve had on my hard drive since 2012. I suspect it was in a free download from a magazine or website somewhere. To change it up from a straight forward loop, I automated the clip volume and pitch inside the sample envelope. You’ll see there are a few that are a different color from the main ones. I’ve added variation to these by moving the start point or adjusting the length of the loop.
You have used a series of devices on track 26, including an arpeggiator which is a less obvious technique to use on a cowbell sound. Can you walk us through your processes here?
Sometimes I throw an arpeggiator on a MIDI track and experiment with doubled up, faster hits, and additional pitches. This is one way I can explore ideas that I might not write or play instinctively. With this cowbell, the gate time also choked the sound in a charming way.

Finally, what kind of processes do you normally apply to your master channel?
Here I have got an EQ8 with a high shelf to add sparkle, a fast-acting, high ratio compressor to catch peaks, and then a limiter to make sure there are absolutely no clips. I usually render a test version of my tracks to play out with this sort of signal chain. But I leave the final mastering to the professionals.
Eluize, thank you for providing so much insight into the making of this song. What is next on the horizon for you?
Yes. My Lost Palms record Eolian has just come out. My second album, Gone, is forthcoming on Craigie Knowes. There are a few cheeky bits from my side project Cashminus filtering through. I have also recently launched a coaching program focused on supporting women, non-binary, and trans people in electronic music production, performance, and label management. For the next couple of months, I’m heading into focused studio time writing for 2021. Later in the year, I’ve got some lovely gigs in the calendar that I really hope will be possible; I’m longing to connect with smiling faces on a dancefloor again.
You can download Eluize’s “EMDR” now via EDMjunkies+ here. EDMjunkies+ is a monthly subscription service and music community delivering exclusive music and content every month.


